Can You Clean a Furnace Ignitor? Step-by-Step Guide
Can you clean a furnace ignitor? This practical guide covers safe cleaning steps, necessary tools, and maintenance tips, helping homeowners decide when DIY maintenance is appropriate or when to call a pro.

Yes, you can clean a furnace ignitor under strict safety conditions. Cleaning helps remove dust and oil deposits that hinder ignition, but only when the unit is powered off and gas is shut off. If the ignitor is cracked, repeatedly fails, or you smell gas, stop and call a professional.
Understanding Furnace Ignitors and Why They Fail
Furnace ignitors are critical components that help your heating system start by heating or sparking to ignite the fuel-air mixture. They are typically ceramic and delicate, so even small issues can prevent reliable ignition. Over time, dust, condensation, and oil residue can coat the element, reducing heat transfer and delaying ignition. Repeated cycling or thermal stress can cause micro-cracks that aren’t always visible. The Cleaning Tips team notes that knowledge of how an ignitor operates helps homeowners decide whether cleaning is a viable DIY task or if replacement is a better option. In many homes, simple cleaning can restore ignition performance or extend the life of a marginal ignitor when performed carefully and safely. However, never attempt maintenance if you notice cracks, corrosion, or obvious damage to the ceramic insulator, as that indicates a replacement is needed.
Can You Clean a Furnace Ignitor? What to Check Before You Clean
Before you reach for tools, confirm that cleaning is appropriate for your situation. A dirty ignitor usually shows signs like slow or failed ignition, longer start times, or intermittent flame. Do not confuse a dirty burner with ignition problems caused by gas supply, clogged ducts, or faulty flame sensors. If you observe unusual odors, gas smells, or the furnace trips the breaker repeatedly, refrain from cleaning and contact a licensed technician. According to Cleaning Tips analysis, DIY cleaning can improve ignition reliability in many households, but safety remains the top priority. When in doubt, consult the furnace manual or a professional. Remember that some models rely on a hot-surface ignitor that can be more sensitive to cleaning than others, so model-specific guidance matters.
Safety First: Power, Gas, and PPE
Safety is non-negotiable when working on a furnace ignitor. Always shut off power to the furnace at the main breaker, and if you can safely access it, shut off the gas supply valve. Use a flashlight rather than opening damp spaces in poor lighting, and wear gloves and eye protection. Avoid touching the ignitor element directly with bare hands, as oils from skin can create hot spots or cause uneven heating. Work in a well-ventilated area to prevent inhaling dust. If you notice any cracking, chipping, or discoloration in the ignitor, stop and replace it rather than attempt a cleaning. Cleaning should be gentle and kept dry; liquids can damage the element and void warranties. The Cleaning Tips team emphasizes safety first and advises stepping back if anything looks damaged.
Tools, Materials, and What Not to Do
Having the right tools makes the job safer and more effective. Gather a soft brush (new paintbrush or makeup brush), a dry microfiber cloth, compressed air canister (set to a gentle puff), and a flashlight. Avoid using water, solvents, or abrasive cleaners on the ignitor surface, as liquids can cause shorts or permanent damage. If you need access to the ignitor, a screwdriver that fits the service panel screws and a non-conductive tool to carefully loosen clips may be necessary. Do not attempt to remove or bend the ignitor with force; delicate handling reduces the risk of breakage. The goal is to remove loose dust without applying pressure to the ceramic or the ceramic-to-wire joint. Cleaning should be a light touch, focusing on nearby dust rather than scrubbing the element itself. The Cleaning Tips guidance suggests using dry methods and inspecting for damage after cleaning.
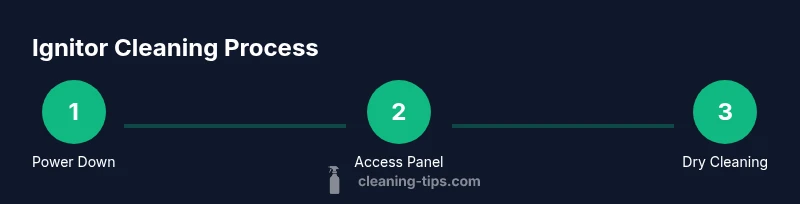
Step-By-Step Overview (High-Level)
This section provides a high-level overview of the process without prescribing every action in a step-by-step checklist. You’ll first locate and access the ignitor by removing the furnace access panel as instructed in the owner’s manual. Then, you’ll assess the ignitor for visible cracks or wear, and carefully remove loose dust with a soft brush or compressed air from a safe distance. Finally, you’ll reassemble the panel and run a test to observe whether ignition improves. Model differences exist, so always consult the manual for model-specific cautions. The aim of this section is to help you evaluate whether cleaning is worth attempting in your situation and to prepare you for when to call a professional if the ignitor shows any signs of damage.
Maintenance and Replacement Considerations
Even when cleaning seems effective, ignitors are wear items with finite lifespans. If the ignitor’s heat element has become discolored, if it glows irregularly, or if ignition remains erratic after cleaning, replacement is often the most reliable path. Replacements should match the model and part number from the furnace manual or supplier. Regular inspection during seasonal maintenance can catch wear early, reducing the risk of sudden no-heat events in winter. It’s wise to budget for a replacement ignitor if your system is a few years old, and to avoid the false economy of over-cleaning or forcing a damaged part to continue functioning. Cleaning Tips recommends balancing DIY maintenance with timely replacement to maintain safe and reliable operation.
When to Call a Pro and What to Expect
If you’re unsure about accessing the ignitor, observing cracks, or you’re dealing with gas smells or a flickering flame sensor, it’s best to call a licensed technician. A pro can safely shut down and test the system, replace a cracked ignitor, and verify ignition with a calibrated gas valve and sensor check. Expect a diagnostic visit to confirm whether debris is the root cause or if the issue lies with the ignitor itself or the control board. Professional service often includes testing for gas leaks, combustion efficiency, and a safety verification that the system meets code requirements. Cleaning Tips emphasizes that professional support is a prudent option when safety doubts exist or the ignitor shows visible wear.
Authority Sources
- U.S. Department of Energy, Heating Equipment Safety and Maintenance: https://www.energy.gov/
- National Fire Protection Association, Fire Safety and Appliance Maintenance: https://www.nfpa.org/
- Occupational Safety and Health Administration (OSHA), Home Comfort and Electrical Safety: https://www.osha.gov/
Tools & Materials
- Safety goggles(Eye protection to shield from dust or debris)
- Nitrile gloves(Protect hands; avoid oils from skin on ignitor surfaces)
- Soft brush (new paintbrush)(Gentle dust removal)
- Dry microfiber cloth(For gentle wiping near surfaces)
- Compressed air canister(Gentle blasts to dislodge dust; keep at a distance)
- Screwdriver set (Phillips/flathead)(To remove service panels; use the right size)
- Non-conductive tool or cotton swabs(Helpful for tight spots without touching element)
- Voltage tester or multimeter(Ensure power is off before handling electrical components)
- Isopropyl alcohol (optional)(Only if manufacturer allows; avoid applying liquid to the ignitor)
Steps
Estimated time: Total time: 15-25 minutes
- 1
Power down and gain access
Turn off the furnace at the main breaker and, if possible, shut off the gas valve. Remove the access panel per your model’s instructions to reach the ignitor area. Ensure you have even lighting and enough space to work safely.
Tip: Take a quick photo of wiring before removing screws to aid reassembly. - 2
Locate the ignitor and inspect
Identify the ignitor assembly and visually inspect for obvious cracks or damage. If the ceramic looks chipped, cracked, or discolored, replacement is likely needed rather than cleaning.
Tip: Do not touch the hot surface; ignitors can remain warm after operation. - 3
Disconnect the ignitor safely
If you can safely access the connector, disconnect the ignitor plug from the harness. Do not pull on wires; disconnect at the plug to avoid wire damage.
Tip: Label the connector or note its orientation to prevent misplugging. - 4
Clean with dry methods
Gently remove dust using a soft brush. Use compressed air in short bursts from a distance to avoid bending the element. Wipe nearby surfaces with a dry microfiber cloth.
Tip: Avoid liquids; moisture can cause shorts or corrosive damage. - 5
Reassemble and double-check
Reconnect the ignitor plug, reattach any panels, and ensure all fasteners are snug. Confirm there are no loose wires and that the area is clean before powering back up.
Tip: Operate in a controlled, dry space to prevent incidental contact with moisture. - 6
Test ignition safely
Restore power and gas, then observe the ignition sequence. If the system still fails to ignite after a clean, consider replacement or professional service.
Tip: If you smell gas or hear continuous firing sounds, shut down and call a pro immediately.
Questions & Answers
Can you clean a furnace ignitor yourself?
Yes, you can perform a careful cleaning if the ignitor shows only dust or minor residue and there are no signs of damage. Always power down and disconnect gas before handling. If you see cracks or odor of gas, do not clean—call a professional.
Yes, you can clean it yourself if there’s only dust and no damage, but always power down and never touch a cracked ignitor. If in doubt, call a pro.
What signs indicate cleaning is needed?
Slow ignition, repeated relights, or longer start times often point to debris on the ignitor or burner. If the flame is weak or the burner is dirty, cleaning near the igniter area may help. Persistent issues after cleaning suggest replacement or professional inspection.
Signs cleaning is needed include slow ignition and longer startup times. If issues persist after cleaning, seek professional help.
Is it safe to clean a furnace ignitor?
Cleaning is relatively safe when you follow safety steps: shut off power and gas, dry-clean only, and handle the ignitor without touching the heating element. If you see damage, stop and replace the ignitor.
It can be safe if you follow power-off and dry-clean guidelines and avoid damaged parts.
What should I do if the ignitor cracks?
A cracked ignitor should be replaced rather than cleaned. A cracked ceramic element can cause short circuits, gas leaks, or unsafe ignition. Check the model number and replace with an identical part.
If the ignitor is cracked, replace it rather than trying to clean it.
How often should I inspect or clean the ignitor?
Inspect the ignitor during annual furnace maintenance or if you notice ignition issues. Clean only when there is visible dust or residue and no signs of damage. Do not over-clean or overly touch the element.
Inspect yearly and clean if there’s visible dust, but avoid over-cleaning.
Can cleaning fix an ignition no-ignition problem?
Cleaning alone can fix some no-ignition issues caused by debris, but many failures are due to worn-out ignitors or control hardware. If cleaning doesn’t restore ignition, replacement or professional diagnosis is recommended.
It can fix debris-related no-ignition problems, but usually replacement or professional service is needed for persistent failures.
Should I use liquids when cleaning the ignitor?
Liquids should be avoided entirely. The ignitor is a delicate electronic/mechanical part; moisture can cause shorts or micro-cracks. Stick to dry techniques only.
Never use liquids; stick to dry methods only.
The Essentials
- Power off before any handling.
- Only clean on undamaged ignitors.
- Dry cleaning is preferred; avoid liquids.
- Replace damaged ignitors rather than attempting risky fixes.