How to Clean the EGR Valve: A DIY Car Maintenance Guide
Learn how to clean the EGR valve safely at home with practical steps, tools, and safety tips from Cleaning Tips. Improve idle, reduce emissions, and protect engine performance.

Want to restore smoother idle and reduce emissions? This guide shows you how to clean the EGR valve safely at home. You’ll learn when cleaning is needed, which tools to use, and the step-by-step process to remove, inspect, and clean the valve without damaging the engine. Follow along to learn how to clean the egr valve confidently.
What is the EGR valve and why clean it?
The exhaust gas recirculation (EGR) valve is designed to route a portion of exhaust gases back into the intake manifold. This lowers combustion temperatures and reduces nitrogen oxide (NOx) emissions. Over time, carbon deposits can build up, causing the valve to stick or leak and upset throttle response. Regularly cleaning the egr valve helps maintain proper airflow, improves idle quality, and can prevent rough running. According to Cleaning Tips, keeping the EGR system clean supports engine efficiency and smoother performance. The Cleaning Tips Team also notes that a well-maintained EGR system helps minimize emissions-related drivability problems, which is especially important for homeowners who want a healthier, cleaner car. When you decide to clean the egr valve, proceed with care and follow safety steps to avoid damage to gaskets, seals, or vacuum lines.
Signs your EGR valve is clogged and needs attention
A clogged EGR valve often manifests as rough idle, stalling at stoplights, and reduced engine power during acceleration. You might notice a pinging or knocking sound at light loads, or a stale exhaust smell from the tailpipe. The check engine light may illuminate with codes related to vacuum leaks, manifold pressure, or EGR flow. If you experience higher fuel consumption or noticeable hesitation when you press the accelerator, it could indicate restricted EGR flow. In these cases, cleaning the valve can restore proper function and reduce the risk of more serious repairs later. Cleaning Tips would emphasize using proper tools and methods to avoid damaging the valve or intake passages, and to verify operation after reassembly.
Safety and prep before you start
Before any disassembly, ensure the engine is cool and the vehicle is on a flat, stable surface. Disconnect the negative battery cable to prevent shorts while you work around electrical connectors. Wear safety glasses and gloves to protect against sharp edges and cleaners. Work in a well-ventilated area, especially when using solvents. Documenting your steps with photos can help you reassemble correctly. Remember, the goal is to clean the egr valve without harming other components, so take your time and double-check hose clamps and electrical connections as you go.
How the cleaning helps your engine and emissions (conceptual overview)
Cleaning the egr valve removes stubborn carbon buildup that restricts exhaust gas flow. When flow improves, combustion temperatures stay more stable, reducing heat-related engine stress and improving throttle response. A clean valve also helps maintain a steady idle and can improve overall efficiency. This is particularly beneficial for vehicles driven in stop-and-go city traffic, where EGR cycling is frequent. While cleaning can fix performance issues caused by deposits, persistent problems may indicate a worn valve, damaged gasket, or another intake issue that may require professional inspection.
Tools and materials you’ll likely need
Gather a socket set, screwdrivers, pliers, a gasket scraper, and engine-safe cleaners designed for EGR systems. You’ll also want a new EGR gasket, rags or lint-free towels, gloves, eye protection, and a way to label or photograph hoses and bolts as you remove them. If your vehicle manual specifies a torque value for bolts, have a torque wrench handy. This section also covers safety gear and replacement parts to help you plan a smooth, safe clean the egr valve process.
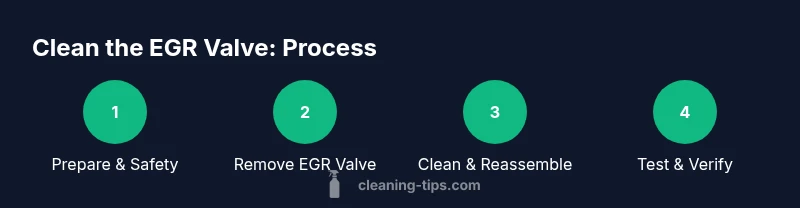
Step-by-step overview of the cleaning process
The actual hands-on steps are detailed in the Step-by-Step section below, but here’s a high-level outline of the process: prepare the vehicle, locate and remove the EGR valve, visually inspect for damage, apply a suitable cleaner to carbon deposits, scrub lightly without damaging seals, reinstall with a new gasket, and reconnect hoses and electrical connectors. Always test for leaks and verify engine performance after completion.
Post-clean checks and maintenance to prevent buildup
After reassembly, start the engine and let it reach operating temperature. Listen for leaks around the gasket, vacuum lines, and connections. Check for rough idle or hunting RPM during warm-up and drive cycles. To prevent future buildup, follow routine maintenance intervals, use high-quality fuel, and avoid long periods of idling. Documenting your maintenance in a log can help you track when the valve and related components were last serviced.
Common mistakes to avoid and how to reduce risk
Avoid forcing components or using aggressive solvents that can damage seals or plastics. Don’t remove components beyond what your vehicle manual allows, as improper disassembly can lead to gasket damage or wiring issues. Incorrectly reconnecting vacuum hoses can cause drivability problems or check engine codes. If you’re uncertain about your access or torque specs, consult the vehicle manual or seek professional help.
Tools & Materials
- Socket set (metric sizes 8-14mm)(Essential for removing mounting bolts.)
- Screwdrivers (flathead and Phillips)(Useful for hose clamps and covers.)
- Pliers(Helpful for hose clamps and springs.)
- Gasket scraper(To clean old gasket residue.)
- Carburetor/intake cleaner or engine-safe cleaner(Use as directed on the label.)
- Brake cleaner (optional)(For degreasing hard-to-reach areas.)
- Rags or lint-free towels(Keep surfaces clean and dry.)
- New EGR gasket(Replace to ensure proper sealing.)
- Gloves(Protect hands from solvents and heat.)
- Safety glasses(Eye protection from splashes and debris.)
- Torque wrench (optional)(Adhere to vehicle manual torque specs.)
- Vehicle service manual (optional)(Verify access and torque requirements.)
Steps
Estimated time: 60-90 minutes
- 1
Prepare the vehicle and safety checks
Park on a level surface, engage the parking brake, and ensure the engine is cool. Disconnect the negative battery terminal to prevent shorts while you work near electrical connectors. Put on safety glasses and gloves, and gather your tools so you’re ready to work without interruptions.
Tip: Label or photograph hose connections to reassemble correctly. - 2
Locate and remove the EGR valve
Follow the vacuum lines and mounting bolts to locate the EGR valve. Carefully disconnect hoses and wiring, noting their positions. Remove bolts with the correct socket size and set the valve aside on a clean surface.
Tip: Keep bolts organized in a labeled tray to avoid misplacement. - 3
Inspect for carbon buildup
Visually inspect the valve bore and passages for heavy carbon deposits. If the valve is sticky or the passages are caked with deposits, plan to clean thoroughly. Check gaskets and seals for wear that may require replacement.
Tip: If the valve appears damaged, replacement may be safer than cleaning. - 4
Clean the valve and passages
Apply a solvent-safe cleaner to carbon deposits and gently scrub with a soft brush or cloth. Wipe away residue until surfaces are clean but do not force into seals. Avoid soaking electronic components or delicate sensors.
Tip: Keep cleaners away from plastic vacuum lines to prevent damage. - 5
Reinstall the valve and gaskets
Reinstall with a new gasket. Reattach hoses and connectors in the correct order and tighten bolts to the manufacturer’s torque specs. Reconnect the battery cable and ensure all connections are snug but not over-tight.
Tip: Hand-tighten bolts first, then torque to spec if you have a torque wrench. - 6
Test the system and verify operation
Start the engine and let it reach normal operating temperature. Check for vacuum leaks and listen for abnormal sounds. If equipped, use a scan tool to clear codes and verify no new codes appear after a short drive.
Tip: If any leak or misfire occurs, recheck connections and gaskets.
Questions & Answers
Can I clean the EGR valve without removing it?
In some cases you can access and clean deposits without full removal, but thorough cleaning and inspection usually require removing the valve. Refer to your vehicle manual for access specifics.
Sometimes you can clean without removing it, but full access often requires removal.
What solvents should I avoid when cleaning the EGR valve?
Avoid aggressive cleaners that can damage seals or plastic components. Use engine-safe cleaners designed for EGR systems, and never use kerosene or motor oil as a cleaner.
Avoid harsh solvents; use engine-safe cleaners and follow the label.
How often should the EGR valve be cleaned?
There is no universal interval. Clean the EGR valve when you notice symptoms like rough idle or reduced performance, or as part of a scheduled emissions system maintenance per your manual.
Clean when you notice symptoms or as part of your maintenance schedule.
Will cleaning the EGR valve fix the check engine light?
If the code is due to carbon buildup restricting flow, cleaning can clear the code. If the issue is mechanical wear or a failed sensor, a professional diagnosis may be required.
It may clear the code if the cause is clogging, but not always.
Do I need to replace the gasket after cleaning?
Yes. Replace the gasket whenever you reinstall the EGR valve to ensure a proper seal and prevent leaks.
Replace the gasket when you reassemble.
Is it safe to drive after cleaning, or should I seek a professional inspection?
You can drive after cleaning, but monitor for leaks and codes. If you’re not confident in the reinstall or you see leaks, have a professional inspect it.
Yes, but watch for leaks and codes; consider a pro if unsure.
Watch Video
The Essentials
- Identify symptoms early to decide on cleaning.
- Gather the right tools and a new gasket before starting.
- Follow torque specs and recheck all connections.
- Test the engine after completion and monitor for leaks.