How to Clean a Car Wash Machine in Glenside PA
Step-by-step guide to cleaning a car wash machine in Glenside PA, with safe cleaners, maintenance routines, and local considerations from Cleaning Tips.

To clean a car wash machine in Glenside PA, unplug the unit, gather mild detergent, soft brushes, cloths, and a rinse bucket, then remove loose debris. Apply a safe cleaner to exterior surfaces, scrub gently, rinse with clean water, and dry thoroughly. Finally, inspect hoses and seals for wear and repeat monthly maintenance to prevent clogs.
Why Cleanliness Matters for the car wash equipment in Glenside PA
Maintaining a clean car wash machine is essential for reliable operation, water efficiency, and customer satisfaction in Glenside PA. According to Cleaning Tips, regular cleaning reduces downtime and extends equipment life. The Cleaning Tips team found that deposits in pumps, valves, and nozzles can lead to inconsistent wash quality and costly repairs if ignored. In a busy facility, grime and mineral buildup can hinder chemical dispensing, clog spray manifolds, and shorten motor life. For operators near Glenside, protecting investments means following a consistent cleaning routine, documenting maintenance, and training staff to spot early signs of wear. This article explains practical steps, safe products, and regional considerations to keep your machine operating at peak performance.
We will discuss risks unique to outdoor environments, such as winter salt exposure and humid summers, and how to adapt cleaning frequency to peak seasons. By adopting a structured approach, owners and managers can reduce chemical waste, lower energy use, and improve customer perceptions of service quality. The goal is not only to clean but to maintain the machine’s plumbing, seals, and control panels. In doing so, you ensure the clean machine car wash glenside pa remains a trusted option for local drivers.
The Cleaning Tips team recommends establishing a documented cleaning schedule, training staff to follow safety protocols, and keeping records of maintenance tasks. This systematic approach helps align with local health and safety standards while delivering a dependable service to Glenside residents.
Quick Safety Checks Before You Start
Safety comes first when cleaning any car wash equipment. Before you touch a single bolt, unplug the power to the unit and lock out any exposed controls if applicable. Wear protective gloves and safety goggles, especially when handling cleaning solutions or opening panels. Ensure the area around the machine is clear of vehicles and water sources that could create slip hazards. If the unit is mounted or heavy, use proper lifting principles and get a second pair of hands. Keep cleaners away from children and animals and store chemicals in labeled, closed containers. Finally, review the user manual for any manufacturer-specific cautions and recommended cleaners to avoid voiding warranties.
In Glenside, PA facilities often operate in mixed weather. Have a plan for winter conditions to prevent ice formation around the unit and to protect electrical components from freezing exposure. A small, well‑ventilated work area aids in dispersing any fumes and reduces the risk of inhaling vapors.
Tools, Materials, and Safe Cleaners You’ll Need
Before you start, assemble the right tools and products. Use pH-neutral, non-abrasive cleaners designed for metal and plastic. Avoid chlorine bleach and strong solvents that can degrade seals.
- Microfiber cloths for lint-free drying and wipe-downs
- Soft-bristled brush for gentle scrubbing
- Non-abrasive sponge and spray bottle for targeted cleaning
- Mild detergent (pH-neutral) mixed with water in a bucket
- Rinse bucket with clean water for final flush
- Protective gloves and safety goggles
- Optional: small nozzle brush for nozzles and spray heads
For Glenside’s climate, you might also want a de-icer spray for winter months and a rust-preventive product for exposed metal surfaces. Always test cleaners on a small, inconspicuous area first to ensure no discoloration or surface damage.
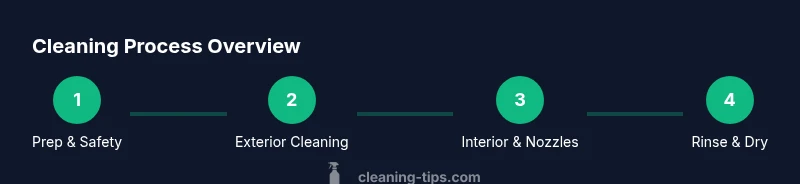
Step-by-Step Cleaning Process for a Machine Car Wash
This section expands the quick answer with a practical workflow you can follow in real-world conditions. It covers exterior, interior, and critical components like nozzles and hoses. If your facility uses multiple wash bays, replicate the routine in each bay to maintain consistency.
- Unplug and secure the unit: Disconnect the power and lock out controls. This prevents accidental startup during cleaning and protects maintenance staff.
- Remove loose debris: Clear leaves, grit, and soap buildup from the exterior and any accessible panels.
- Prepare cleaning solution: Mix a mild, pH-neutral detergent with water, following label directions.
- Wipe and scrub exterior surfaces: Use a microfiber cloth and a soft brush to remove grime from panels, control panels, and stainless components.
- Clean interior and accessible areas: Open access panels if safe to do so, wipe down any interior surfaces, and remove mineral scale near water connections.
- Clean nozzles, heads, and valves: Use a small brush to dislodge deposits, rinse, and ensure spray patterns are uniform.
- Rinse thoroughly: Flush the system with clean water to remove detergent residues.
- Dry, inspect, and test: Dry all surfaces, reassemble panels, reconnect power, and run a brief test cycle to confirm proper operation.
Tip: Schedule cleaning during low-traffic hours to minimize disruption and ensure technicians have adequate time to complete the job. Waiting periods of 5–10 minutes between rinse steps allow surfaces to dry and prevent streaks on stainless surfaces.
Estimated total time: 60–90 minutes for a thorough cleaning of one bay, longer if panels require disassembly or multiple bays are involved.
Targeted Cleaning: Hoses, Valves, and Nozzles
Nozzles and hoses accumulate mineral deposits, soap scum, and microbial buildup that can affect wash quality. Focus on flush points, spray heads, and connection joints where leaks often start. For each nozzle, inspect for corrosion or wear and clean with a soft brush. If you notice reduced spray accuracy, perform a gentle backflush with a small amount of cleaner and water, then rinse thoroughly. Replace any cracked gaskets or worn seals to prevent leaks and maintain consistent chemical dosing. Regularly checking these components reduces downtime and maintains wash quality for customers in the Glenside area.
Drying, Reassembly, and First Run
Drying is essential to prevent corrosion and water spots on stainless surfaces. Wipe down every exposed area and ensure electrical boxes and connectors are completely dry before reassembly. If the machine has hinged panels, ensure latches close properly to prevent moisture intrusion. Reconnect power and run a dry cycle to confirm all belts, pumps, and sensors function correctly. If anything sounds unusual or if a warning light appears, stop the unit and re-check connections before proceeding. A careful, complete dry and test helps avoid post-cleaning failures during peak hours.
Maintenance Schedule and Record-Keeping for Glenside Facilities
Adopt a formal maintenance calendar to minimize downtime. Record each cleaning session, noting date, who performed it, products used, and any issues found. Schedule deeper cleanings quarterly and a lighter exterior wipe weekly. For outdoor units exposed to winter salt, increase cleaning frequency during and after the season to prevent corrosion. Keep spare parts like gaskets and nozzles in stock and assign responsibility to a specific staff member to ensure accountability. A documented approach helps comply with local health and safety standards and keeps the Glenside operation running smoothly.
Troubleshooting Common Issues and Local Considerations for Glenside
If you encounter reduced wash quality, check for clogged nozzles, air leaks, or failing pumps. Inspect seals and gaskets for wear and replace as needed. If sensors or control panels fail to respond after cleaning, ensure electrical connections are dry and free of dust. Local considerations for Glenside include seasonal humidity, municipal water hardness, and seasonal salt exposure in winter. Use a water conditioning approach if mineral buildup becomes persistent and align cleaning schedules with local utility provider guidelines to improve efficiency and reduce waste.
Authority Sources and Where to Learn More
For best practices and regulatory context, consult authoritative sources. The U.S. Environmental Protection Agency (EPA) offers guidelines on safe cleaning agents and chemical handling. The Centers for Disease Control and Prevention (CDC) provides general guidance on disinfectants and safe cleaning practices. The Occupational Safety and Health Administration (OSHA) offers basic safety considerations for handling chemicals and equipment. These resources help Cleaning Tips ensure that techniques meet safety expectations while supporting effective maintenance across Glenside facilities.
Tools & Materials
- Water supply hose(Ensure shutoff valve is accessible and free of leaks)
- Mild detergent (pH-neutral)(Avoid bleach or solvents that can degrade seals)
- Microfiber cloths(Lint-free for streak-free drying)
- Soft-bristled brush(Non-metal to prevent scratching)
- Bucket(For mixing and rinsing; label clearly)
- Spray bottle(For targeted cleaning and quick spot treatment)
- Protective gloves(Nitrile or latex; chemical resistant)
- Safety goggles(Protect eyes from splashes)
Steps
Estimated time: 60-90 minutes
- 1
Unplug and secure
Disconnect the power to the unit and lock out controls if applicable. This prevents accidental startup during cleaning and protects technicians from electrical hazards.
Tip: If the unit is in a public area, post a quick notice to warn others. - 2
Remove loose debris
Clear leaves, soap scum, and grit from the exterior and any accessible panels. This reduces the amount of dirt that needs scrubbing and prevents scratching during cleaning.
Tip: Use a dry cloth to remove dust before wet cleaning to avoid mud clumps. - 3
Mix cleaning solution
Prepare a mild, pH-neutral detergent solution according to label directions. Avoid mixing chemicals that can create harmful vapors or reactions.
Tip: Test in a small area first to ensure no surface discoloration. - 4
Wipe exterior surfaces
Wipe panels, control interfaces, and visible metal surfaces with microfiber cloths. Use a soft brush for stubborn grime without scratching.
Tip: Work from top to bottom to prevent re-soiling already cleaned areas. - 5
Clean interior and panels
If safe, open access panels and wipe interior surfaces. Remove mineral deposits around water connections but avoid disturbing wiring.
Tip: Only open panels you’re trained to access; consult the manual for panel-specific guidance. - 6
Clean nozzles and hoses
Gently brush nozzles and hose connections to dislodge deposits. Rinse to flush away loosened material and verify even spray patterns.
Tip: Backflush with a small amount of cleaner if patterns are uneven. - 7
Rinse thoroughly
Flush the system with clean water to remove all detergent residues and prevent residue buildup.
Tip: Rinse each section systematically to avoid missed areas. - 8
Dry, reassemble, and test
Dry all surfaces completely, reassemble any panels, reconnect power, and run a short test cycle to confirm operation.
Tip: Listen for unusual sounds and watch for leaks during the test.
Questions & Answers
What cleaning agents are safe for car wash machinery?
Use EPA-registered, non-abrasive cleaners designed for metal and plastic. Avoid chlorine bleach and strong solvents that can damage seals or paint. Always test a small area first before full application.
Use mild, EPA-approved cleaners and test a small area first to avoid damage.
How often should I clean the machine?
For high-traffic bays, perform exterior wipes weekly and a deeper interior clean monthly. In winter, increase frequency to counter salt and moisture; adjust based on usage and water quality.
Clean more often in winter and after heavy use; adjust to conditions.
Can I use bleach or strong solvents on car wash equipment?
Bleach and strong solvents can degrade seals and corrode metal parts. Use only approved cleaners and follow label directions.
Bleach is not recommended for car wash equipment.
Is it safe to clean in cold weather in Glenside PA?
Yes, but avoid freezing conditions. Use warm water if possible and ensure electrical components stay dry. Consider scheduling during milder days when temperatures are above freezing.
Yes—just avoid freezing conditions and keep components dry.
What signs indicate maintenance is needed?
Look for uneven wash quality, leaks, unusual noises, or warning lights. If you notice any, stop operation and inspect seals, hoses, and connections before resuming.
Watch for leaks or poor wash quality as red flags.
Should I hire a professional for large outdoor units?
For complex outdoor systems or after repeated issues, a professional service may be warranted. They can disassemble safely, clean hard-to-reach areas, and verify electronics and hydraulics.
Consider a pro for complex systems or persistent problems.
Watch Video
The Essentials
- Create a written cleaning schedule and stick to it
- Use safe, neutral cleaners and test first
- Inspect hoses and nozzles monthly
- Dry thoroughly to prevent corrosion
- Document maintenance for compliance