How to Clean a Toilet Tank: Safe, Simple Steps at Home
Meta description: Learn how to clean a toilet tank safely with practical steps. This guide covers supplies, step-by-step actions, safety tips, and maintenance to prevent buildup and protect components.

Cleaning a toilet tank reduces mineral buildup, improves flushing performance, and prevents odors from damp surfaces. This safe, practical approach uses gentle cleaners and proper ventilation. You’ll learn which tools are essential, the safest cleaners for tank components, and how to inspect for leaks during and after cleaning.
Why cleaning the toilet tank matters
A clean toilet tank supports efficient flushes, minimizes mineral buildup on the fill valve and float, and helps curb odors that can originate from damp surfaces near the tank. When you learn how clean toilet tank surfaces, you reduce the chance of mineral deposits interfering with flushing, leaks around gaskets, and awkward running water sounds. Regular attention to the tank is a small but powerful step in overall bathroom hygiene. The Cleaning Tips team notes that maintenance of the tank interior is part of a practical cleaning routine that homeowners and renters can perform with common household cleaners. If you notice your toilet isn’t flushing as smoothly as before, the tank is a logical place to start evaluating the cause. When you follow this guide, you’ll see how simple, mindful cleaning can extend the life of components and keep your bathroom healthier. This article also highlights how to clean a toilet tank without introducing harsh chemicals that could damage seals or metal parts; prevention is easier than repair. If you’re new to this task, begin with the basics and expand to more thorough care as you gain confidence in handling the tank’s interior safely. For those who are curious about the rationale, the phrase how clean toilet tank encompasses both the interior surfaces you can reach and the hidden mechanisms that control flush volume. Remember to ventilate well and wear gloves to protect skin from cleaners. According to Cleaning Tips, approaching the task methodically makes it a straightforward, safe bathroom maintenance project that yields tangible results over time.
Tools and safety prep
Before you begin, assemble the essentials and set up for safe work. The goal is to make the tank surface clean without disturbing the float, fill valve, or flush assembly. You’ll use mild cleaners, not aggressive solvents, and you’ll avoid mixing chemicals that could produce hazardous fumes or dangerous reactions. Proper PPE (personal protective equipment) is a key part of the process. The phrase how clean toilet tank should be understood as a set of deliberate actions that protect both you and the plumbing components. Gather the following items to start.
- Disposable nitrile gloves (essential)
- Safety goggles (essential)
- Bucket (essential)
- Old toothbrush (essential)
- Soft-bristled scrub brush (essential)
- Sponge or microfiber cloth (essential)
- White vinegar (essential)
- Mild dish soap (recommended)
- Spray bottle for vinegar solution (essential)
- Towels or rags for spills (essential)
- Optional baking soda (useful for gentle scrubbing on stubborn spots)
Safety reminders: never mix vinegar with chlorine bleach, and never spray cleaners directly onto exposed electrical components or metal valves. Make a habit of opening a window or turning on a bathroom exhaust fan to keep air circulation up while you work. If you wear contacts, remove them to prevent irritation from any splashes. When you’re ready, turn off the water supply and drain the tank to create a clean slate for the next steps. If the tank lid is heavy or awkward, remove it carefully and place it on a towel to avoid chipping. This stage aligns with the goal of how clean toilet tank while protecting the fixtures involved.
Inside-tank cleaning technique
The interior of a toilet tank contains sensitive components like the fill valve and float. To clean the tank without dislodging parts, avoid harsh chemicals and focus on gentler cleaners that dissolve mineral buildup and soap scum while preserving metal components. A vinegar-based solution is a common, safe option for tackling mineral crusts around screws, bolts, and the lower interior surfaces. Dilute white vinegar with water in a spray bottle or bucket, and apply it to scoured areas with a sponge or soft brush. Use the old toothbrush to target crevices around the flush valve and seam lines where mineral deposits tend to accumulate. When you wipe, focus on one section at a time and rinse with a damp cloth to remove loosened residue. Remember, you’re not aiming for a complete disassembly; you’re focusing on cleaning reachable surfaces while keeping the inner mechanisms in place. As you proceed, continue to follow how clean toilet tank guidelines to avoid disturbing seals. If the tank has accumulated stubborn mineral buildup, a paste made from baking soda and a little water can act as a gentle abrasive; test on a small area first. After scrubbing, rinse the interior with a small amount of clean water, using the rinse to lift debris toward the overflow tube. Always recheck the area around the flush valve for dislodged pieces and ensure nothing obstructs the path of the water as it refills.
In short, the goal is to remove the surface grime and mineral residues without introducing damage to the tank’s working components. The Cleaning Tips team emphasizes that patience and controlled scrubbing yield the best outcomes and minimize risks to seals and metal parts. The phrase how clean toilet tank helps you frame the process as a careful, incremental task rather than a brute-force cleaning job. If you plan to use baking soda, apply it as a gentle paste rather than a soaking solution to avoid creating grit that can scratch valve seals. Always finish with a thorough rinse and a quick check of the flush mechanism before proceeding to the final refill stage.
Exterior care and maintenance
While interior cleaning is the focus, exterior care of the tank and surrounding area matters too. Wipe the exterior surface of the tank lid, both sides, with a damp cloth and a mild soap solution to remove fingerprints, dust, and soap residue. Check the underside of the lid and the area where the tank sits on the tank bolts for any signs of corrosion or mineral deposits. Inspect the water supply line for any leaks and tighten fittings as needed, but do not overtighten metal connections. A clean exterior makes it easier to notice leaks or drips after the tank refills. The process of how clean toilet tank includes attending to the exterior so you can observe any changes that occur during the next steps. After you finish cleaning the interior, reattach the lid carefully and wipe away any condensation that could cause new mineral deposits on the outside. If you have a metal toilet seat hinge, take a moment to wipe it down as well, using a mild fragrance-free cleaner to avoid staining.
In general, regular exterior maintenance complements interior cleaning by creating a comprehensive approach to bathroom cleanliness. You’ll find that keeping a small bottle of vinegar based cleaner handy can simplify future touch-ups and help you manage routine care more efficiently. The aim is to develop a habit around how clean toilet tank and surrounding components so the bathroom remains fresh with minimal effort.
Troubleshooting and when to call a pro
If you notice persistent leaks after refilling, or if you’re unsure about a component’s condition, it’s time to reassess the task. Common issues after cleaning include a slow refill, a wobbly or noisy fill valve, or a persistent damp spot near the base. Before calling a plumber, double-check the water supply valve to ensure it’s fully open (but not forced) and verify that you didn’t disturb the gasket between the tank and bowl. If the toilet still doesn’t operate normally, consider whether the fill valve or flapper may need replacement rather than cleaning alone. In some cases, a professional inspection ensures the leak source is found accurately and repaired safely. This section ties back to the idea of how clean toilet tank as part of a broader bathroom maintenance routine. If the tank continues to show signs of mineral buildup quickly after cleaning, you may be facing hard water effects, in which case installing a filter or using a descaling product designed for plumbing components could help. The important principle is to avoid aggressive cleaners that could degrade the seals or corrode metal parts. In any scenario, document what you did and monitor the performance over the next few flush cycles. With careful observation, you can determine whether a professional service is warranted and ensure the tank remains in good working order.
Tools & Materials
- Disposable nitrile gloves(Protects hands from cleaners)
- Safety goggles(Prevents splashes from reaching eyes)
- Bucket(Catch drips and hold solution)
- Old toothbrush(Target tight crevices around valves)
- Soft-bristled scrub brush(Gentle scrubbing without scratching)
- Sponge or microfiber cloth(Wipe surfaces without scratching)
- White vinegar(Safe, mild descaling solution)
- Mild dish soap(Gentle cleaner for exterior surfaces)
- Spray bottle(Mix and apply vinegar solution)
- Towels or rags(Mop spills and dry surfaces)
- Optional baking soda(Gentle abrasive for stubborn spots)
Steps
Estimated time: 15-25 minutes
- 1
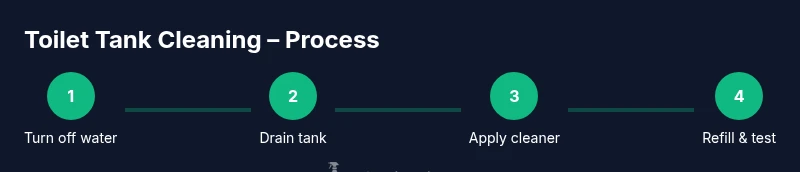
Turn off water and drain the tank
Locate the shut-off valve near the wall and turn it clockwise until it stops. Lift the toilet tank lid and slowly drain water into the bucket to clear the tank. Wait a few moments for any residual water to settle before starting the cleaning.
Tip: Doing this first prevents splashes and makes the interior easier to reach. - 2
Remove lid and inspect components
Carefully lift the tank lid and place it on a soft surface. Visually inspect the flush valve, fill valve, and gaskets for cracks, wear, or mineral buildup. Do not tamper with the float or valve arms unless you are confident in the mechanism.
Tip: Take a quick photo if you’re unsure how the parts are assembled before you touch anything. - 3
Prepare cleaning solution
Mix a mild vinegar solution in the spray bottle (about 1 part vinegar to 1 part water) and have a small amount of dish soap ready for exterior surfaces. Never mix vinegar with bleach or ammonia. Use baking soda only as a gentle paste if needed.
Tip: Ventilate the room to avoid fumes and wear goggles to protect your eyes. - 4
Clean interior surfaces
Spray the interior surfaces with the vinegar solution and scrub gently with the toothbrush and brush. Target mineral deposits around bolts, seams, and the edge of the flush valve. Use a damp cloth to wipe away loosened residue as you go.
Tip: Avoid aggressively scrubbing the flush valve seal; damage can cause leaks. - 5
Rinse and dry
Rinse the interior with a small amount of clean water from the bowl, then wipe down with a dry cloth. Ensure no cleaner remains that could react with metal components. Recheck the area around the valve for any dislodged pieces.
Tip: A quick rinse helps prevent residue from drying onto parts. - 6
Refill and test for leaks
Reconnect the water supply and turn it on fully. Let the tank refill and then flush a few times to verify smooth operation. Check around the seals for leaks and listen for any unusual sounds.
Tip: Keep an eye on the bottom edge for slow drips after refilling.
Questions & Answers
Is it safe to clean inside the toilet tank?
Yes, it’s safe if you use gentle cleaners and avoid disassembling critical components. Stick to vinegar or mild dish soap for interior surfaces and avoid harsh solvents near the valve assembly.
Yes, you can clean inside the tank safely using gentle cleaners and avoiding disassembly of the valve parts.
What cleaners are safe for toilet tanks?
White vinegar with water and a mild dish soap are generally safe for interior surfaces. Avoid bleach-based cleaners near metal components and seals.
White vinegar and mild soap are usually safe; avoid bleach near metal parts.
Should I turn off the water before cleaning?
Yes. Turning off the water and draining the tank prevents spills and ensures you can clean without active water flow.
Yes, shut off the water to prevent spills and drain the tank first.
How often should I clean the toilet tank?
Clean as needed if you notice mineral buildup or poor flushing. For many households, annual or semi-annual checks help maintain performance.
Clean when you notice buildup or flushing issues, typically a few times a year depending on water quality.
Can cleaning damage the fill valve or seals?
Yes, harsh chemicals or aggressive scrubbing can wear seals or dislodge fittings. Use gentle tools and avoid disassembling the valve unless necessary.
Yes, use gentle tools and avoid aggressive disassembly to prevent damage.
What if I still have leaks after cleaning?
If leaks persist, inspect gasket seals and the connections around the fill valve. If unsure, consult a plumber for a safe assessment.
If leaks persist, check seals and connections; consider a plumber if unsure.
Watch Video
The Essentials
- Power off water supply before starting.
- Use safe cleaners like vinegar and mild soap.
- Avoid harsh chemicals that can damage seals.
- Check for leaks after refilling and flushing.
- Regular, gentle maintenance prevents buildup and saves repairs.