How to Put Toilet Cleaner in Cistern: A Safe Step-by-Step Guide
Learn the safest way to put toilet cleaner in cistern with this practical how-to. From product choice to step-by-step application, tips, and maintenance, Cleaning Tips covers it all for a healthier home.

You’ll learn how to put toilet cleaner in cistern safely, including how to choose cistern-safe products, how to apply them, and how long to leave them before flushing. This quick guide highlights essential safety steps, proper dosing, and when to re-clean. It’s a practical start for homeowners and renters alike.
Why proper application matters
When learning how to put toilet cleaner in cistern, correctness matters for safety, effectiveness, and long-term maintenance. The Cleaning Tips team emphasizes using products labeled safe for cistern use and following the manufacturer’s directions. Correct application helps prevent mineral buildup, seal damage, and unwanted chemical reactions that can occur if cleaners are mixed or used in excess. A well-executed cleaning routine reduces odors, keeps the flush mechanism functioning smoothly, and minimizes the risk of leaks. In this guide, you’ll see how to select appropriate products, prepare your space, and apply the cleaner with confidence. By sticking to best practices, you’ll protect your toilet’s components and maintain a healthier bathroom environment in 2026 and beyond.
Choosing the right cistern-safe cleaner
Not all toilet cleaners are created equal when it comes to cistern use. Look for products that explicitly state “cistern-safe,” “toilet tank safe,” or similar labeling on the package. Tablet forms are popular because they dissolve gradually and reduce handling of liquid concentrates. If you prefer liquids, measure the recommended dose with a dedicated cup to avoid overuse. Avoid products with bleach or ammonia in high concentrations, as mixing cleaners can release harmful gases. Always check compatibility with your toilet model and seals, and consider products from reputable brands that provide clear instructions and safety warnings. Cleaning Tips recommends selecting a cleaner that fits your flushing system and water quality for best results in a busy household.
Safety and handling basics
Before you begin, put on protective gloves and ensure good bathroom ventilation. Keep cleaners away from children and pets, and never mix different cleaners in the cistern or any nearby containers. Read the label for contact times and rinse instructions. If you have sensitive skin or respiratory issues, wear eye protection and consider performing the task with a second person nearby in case you need assistance. Remember to store cleaners in a cool, dry place away from direct sunlight to preserve their effectiveness. This baseline safety approach helps you complete the task without accidental exposure or spills.
What you’ll need and how to prepare
Gather your items in advance so you can complete the cleaning quickly and safely. You’ll typically need nitrile gloves, a cistern-safe toilet cleaner tablet or liquid, a dosing cup or syringe for liquids, a soft cloth for surface wipe-down, and a towel to catch any drips. Have a flashlight or good lighting so you can inspect the inside of the cistern. Clear the area around the toilet to avoid spills on flooring or rugs. If you’re cleaning a shared bathroom, communicate with others about temporary usage so the tank isn’t flushed while you’re applying the cleaner.
Process overview: what happens when you clean a cistern
The cleaner works by contacting mineral deposits and residue on the interior surfaces and the flush valve seat. Tablets dissolve slowly to release active agents, while liquids disperse more quickly. In either case, allow the product to sit for the recommended dwell time, then flush to rinse away residues. Expect a brief foaming action with some brands, which is normal and harmless when used as directed. After flushing, re-inspect for any remaining buildup and wipe down exterior surfaces to remove splashes. This overview helps you plan steps and time so you’re not surprised by waiting periods.
Common mistakes and how to avoid them
Common missteps include using the wrong product, over-dosing, and mixing cleaners. Always read labels and never substitute one product for another. Do not pour concentrated cleaner directly onto the mechanism, and never mix cleaners with bleach or ammonia. Ensure you flush only after the dwell time and avoid running water while the cleaner is still seated. If you have hard water, mineral deposits may require a second treatment after several days. By avoiding these errors, you’ll keep the cistern’s components intact and avoid costly repairs.
Maintenance tips after cleaning
After finishing, flush a couple of times to rinse thoroughly and prevent residue buildup. Wipe the exterior and the flush mechanism area with a damp cloth to remove any spray or splashes. Schedule routine cistern cleanings every 3–6 months, or per product recommendations, especially in households with hard water or high mineral content. If you notice persistent odors, check the seals and the fill valve for wear. Keeping records of when you cleaned the cistern can help you track maintenance and ensure consistent results.
Quick maintenance plan and practical next steps
Create a simple maintenance plan that aligns with your water quality and the products you use. Rotate between limpieza routines to prevent residue buildup. Consider pairing cistern cleanings with routine toilet bowl cleaning so you maintain overall bathroom hygiene. If you’re renting, confirm with your landlord or property manager about approved products to avoid any lease violations. Keeping a small stock of cistern-safe cleaners can help you stay on schedule and avoid last-minute shopping trips.
Tools & Materials
- Gloves (nitrile or latex)(Protect hands from cleaners; choose comfortable size)
- Cistern-safe toilet cleaner tablet or liquid(Label should indicate cistern-safe or tank-safe)
- Measuring cup or dosing bottle(Use for liquids to ensure accurate dosing)
- Soft cloth or sponge(For exterior wipe-down and splash control)
- Old towel or rag(Place under the cistern area to catch drips)
- Safety goggles (optional)(Extra splash protection if desired)
- Ventilation aid (window or fan)(Helps disperse fumes during cleaning)
Steps
Estimated time: 5-12 minutes total plus dwell time per product
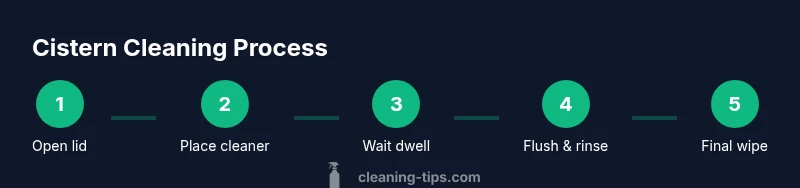
- 1
Open the cistern lid
Carefully lift the cistern lid to access the interior. This allows you to inspect the area and plan the cleaning without splashes. The goal is to have a clear view of the flush valve and interior surfaces before applying any cleaner.
Tip: Work slowly to avoid dropping the lid or disturbing any delicate components. - 2
Place cleaner in the cistern
If using a tablet, drop it into the cistern chamber away from the flush mechanism so it dissolves evenly. If using a liquid, measure the recommended dose into the cistern according to the label. Do not pour directly onto the flush valve.
Tip: Avoid overloading—follow label directions to prevent foaming or residue. - 3
Wait the prescribed dwell time
Allow the cleaner to sit in the cistern for the time specified on the product label. This dwell time lets active ingredients contact and break down buildup before flushing. Do not flush early, as this can reduce effectiveness.
Tip: Use a timer or clock to avoid rushing the dwell period. - 4
Flush to rinse
After the dwell time, flush the toilet to rinse away the cleaner and loosened deposits. A full flush helps carry residues away from the flush valve and pipes. If you notice any residue after the first flush, repeat the rinse once more with the same product if the label allows.
Tip: Run a second flush only if the product instructions permit it. - 5
Inspect and wipe exterior
Check the cistern interior near the rim and the exterior surfaces for any splashes or marks. Wipe with a damp cloth to remove cleaning residues. This keeps the surrounding area clean and reduces slip hazards from spills.
Tip: Use a soft cloth to avoid scratching exposed surfaces. - 6
Replace lid and store safely
Once the interior is clean and dry, replace the cistern lid securely. Store any remaining cleaner in a cool, dry place away from children and pets. Label containers clearly to prevent confusion with other cleaners.
Tip: Take a quick photo of the label for reference if you’re managing multiple products.
Questions & Answers
Do I need to remove the cistern lid before cleaning?
Yes. Lifting the lid provides access to the interior where the cleaner will be applied. It also helps you inspect for leaks or damage before starting.
Yes, you should remove the lid to access the cistern interior and check for any issues before you begin.
Can I use any toilet cleaner in the cistern?
Not all cleaners are safe for cistern use. Look for products labeled cistern-safe and follow the manufacturer’s instructions to avoid damage to seals or pipes.
Not all cleaners are safe for cisterns; choose a cistern-safe product and follow the label.
How long should the cleaner sit in the cistern?
Dwell time varies by product, typically between 5 and 15 minutes. Do not flush before this time unless the label allows.
Dwell time is usually between 5 and 15 minutes, depending on the product.
Is it safe to flush immediately after applying?
Flushing immediately can reduce effectiveness. Follow the product’s dwell time instructions and then flush to rinse.
No—follow the product’s dwell time first, then flush to rinse.
Can cleaning cisterns damage seals or components?
Using cistern-safe products as directed minimizes risk. Avoid harsh concentrates and never mix products, which can damage seals and affect performance.
If you use cistern-safe products as directed, risk to seals is minimized.
What should I do if there’s still buildup after cleaning?
Repeat the cleaning cycle with a cistern-safe product or seek professional help if buildup persists or seals show signs of wear.
If buildup remains, repeat with a cistern-safe product or contact a professional.
How often should I clean the cistern?
Most homes benefit from a cistern cleaning every 3–6 months, depending on water hardness and usage. Adjust the schedule as needed.
Every 3 to 6 months works for many homes; adjust based on needs.
Can I use a tablet and liquid together?
Do not mix tablet and liquid cleaners in the cistern. Choose one method per cleaning cycle and follow the label instructions.
Do not mix tablet and liquid cleaners in the cistern.
Watch Video
The Essentials
- Choose cistern-safe cleaners and follow label directions
- Apply with gloves and good ventilation for safety
- Dwell time is essential for effectiveness before flushing
- Rinse thoroughly and wipe exterior after cleaning
- Schedule regular cistern maintenance to prevent buildup