How Clean Is Your House? A Practical Guide
Learn to assess and improve your home's cleanliness with a practical, step-by-step routine. Tackle high-traffic areas, decluttering, and air quality for a healthier home.

By the end, you’ll answer how clean is your house by evaluating everyday surfaces, air quality, and clutter, then following a repeatable, 4-step routine. You’ll use simple checks and trusted tools to measure progress, identify problem areas, and establish safer, healthier cleaning habits for your home. This quick benchmark helps renters and homeowners gauge consistency and spot overlooked corners within a weekend.
How to measure cleanliness: a practical framework
Cleanliness is more than a fresh shine; it’s a repeatable assessment of everyday surfaces, clutter, air quality, and routine maintenance. According to Cleaning Tips, a practical benchmark focuses on high-contact zones and visible chaos, then uses simple checks to track progress over time. Start by choosing a consistent reference area, like the living room or entryway, and decide what you will measure—soil on smooth surfaces, dust on vents, and whether spaces feel calmer and more organized. Use a simple pass/fail model: can you see obvious soil, or does the space meet your standards for a clean home? This approach lets renters and homeowners gauge how clean is your house without turning cleaning into a never-ending project. As you practice, you’ll notice which areas improve first and where grime tends to accumulate, guiding future sessions and preventing scope creep.
Key areas that determine cleanliness
There are four core zones that drive the perception of cleanliness: high-traffic surfaces, floors, bathrooms, and kitchens. High-contact surfaces like door handles, switches, and remote controls pick up grime quickly; clean them more frequently with a microfiber cloth. Floors show wear as dirt and dust migrate from entryways; vacuum or sweep before mopping. Bathrooms accumulate soap scum and mildew if not cleaned regularly; focus on sinks, toilets, and showers. In kitchens, wipe counters, appliance fronts, and dining surfaces daily to reduce bacteria and cross-contamination. Beyond surfaces, keep clutter under control because visible mess makes spaces feel dirtier than they are. By keeping these zones tidy, you improve not only cleanliness but also daily efficiency and comfort. Cleaning Tips notes that consistent attention to these areas yields the most noticeable results for most homes.
The role of decluttering in cleanliness
Decluttering reduces hidden dirt and simplifies cleaning tasks. By removing unused items, you create open, wipeable surfaces and fewer nooks for dust to settle. Start with a small area like a kitchen cabinet or a bathroom drawer, then extend to living spaces. As you declutter, group items into keep, donate, and discard piles, and label storage so items return to their appropriate spots. A neat environment reduces time spent searching for things and minimizes the spread of dust as you move between rooms. Cleaning Tips emphasizes that decluttering is not just cosmetic; it supports healthier air flow and better cleaning outcomes by limiting surfaces that collect grime. The result is a home that looks cleaner, feels calmer, and is easier to maintain.
Cleaning cadence and routines that actually work
Consistency beats intensity. Establish a predictable rhythm: quick daily touch-ups, a deeper weekly session, and a seasonal deeper clean for areas that accumulate grime over time. A daily 10-minute tidy can prevent build-up; a weekly 60-minute session can address the bulk of dirt; a seasonal sweep (2–3 hours) handles neglected zones like baseboards or behind appliances. Use a simple checklist and a timer to stay on track. Balance is essential: if you dread a long cleanup, break tasks into micro-actions you can complete in under 5 minutes. Tailor frequency to your lifestyle, but aim for a predictable pattern that becomes automatic. Cleaning Tips recommends tracking progress with a simple log to stay motivated.
Tools, supplies, and what to avoid
Having the right tools matters more than fancy products. Start with microfiber cloths, an all-purpose cleaner, a glass cleaner, a vacuum, and a mop. Keep separate cloths for glass and counters to prevent cross-contamination, and use a dab of cleaner rather than soaking surfaces. For delicate surfaces, test cleaners in an inconspicuous spot first. Avoid mixing cleaners that can release harmful fumes; never combine bleach with ammonia. Store tools in a designated caddy so you can grab them quickly during a check. If you’re sensitive to chemicals, opt for non-toxic cleaners and consider a simple air purifier to support indoor air quality. The goal is effective cleaning with safe, accessible supplies. Cleaning Tips underscores that the right routine matters as much as the products used.
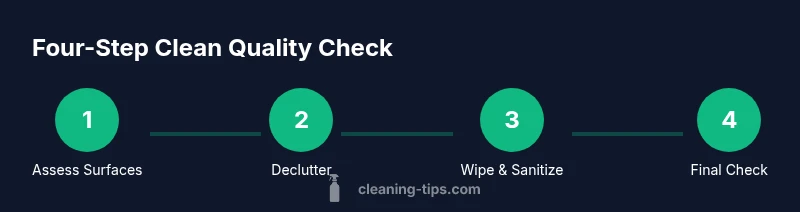
A quick 4-step weekly check you can perform
Perform a four-step weekly check: 1) scan for clutter and target one zone; 2) wipe all high-touch surfaces; 3) vacuum or sweep floors; 4) review the results and adjust the plan for next week. This quick routine keeps momentum and reduces the feeling of overwhelm. By keeping the cadence simple, you’ll steadily improve perceived cleanliness and maintain healthier living spaces without burning out.
Involving others in maintaining cleanliness
Share responsibilities with household members: designate roles, create a rotating schedule, and set shared expectations. Use a quick 2-minute huddle at the start of the week to assign rooms and tasks and celebrate small wins. When everyone contributes, chores become predictable, and the home feels consistently cleaner. Consider a communal checklist or app that tracks who did what, reducing resentment and building accountability. A collaborative approach also teaches children good habits and distributes effort more evenly.
Common pitfalls and how to fix them
Rushing through tasks leads to missed spots; decluttering in bursts can re-create clutter quickly; relying on scent to judge cleanliness may hide dirt; using the wrong cloth or cleaner can leave streaks. To avoid these, stick to a top-down sequence, allocate time for decluttering, and use the correct tools for each surface. Maintain a simple standard—quietly but consistently measure results and adjust accordingly. If you notice a recurring problem, re-evaluate your tools and cadence to address the root cause rather than chasing symptoms.
Tools & Materials
- Microfiber cloths(Lint-free; at least 3 for different surfaces)
- All-purpose cleaner(Prefer non-toxic or eco-friendly)
- Glass cleaner(For mirrors/windows)
- Disinfectant wipes
- Mop and bucket / spray mop(For hard floors; ensure wringing ability)
- Vacuum with attachments(Crevice tool for edges)
- Microfiber duster
- Trash bags(Line and replace bins)
- Gloves(Protect hands during cleaning)
- Sponge(Non-abrasive for delicate surfaces)
Steps
Estimated time: 60-90 minutes
- 1
Prep the space
Clear surfaces, remove clutter, and set a clear plan for the session. This reduces distractions and ensures you address the right areas.
Tip: Set a 5-minute prep window and gather all supplies before you begin. - 2
Dust from top to bottom
Start with the highest surfaces and work downward. Dusting the top shelves prevents settling on cleaned areas.
Tip: Use a microfiber cloth and a gentle back-and-forth motion. - 3
Clean key surfaces
Wipe kitchen counters, bathroom surfaces, and dining tables with a microfiber cloth dampened with cleaner. For stubborn spots, let the cleaner sit 1-2 minutes before wiping.
Tip: Avoid mixing cleaners; use separate cloths for different zones. - 4
Clean glass and mirrors
Mist glass surfaces and wipe in a zig-zag pattern to avoid streaks. Dry with a second cloth for shine.
Tip: Fold the cloth to a clean side as you work. - 5
Tackle floors
Vacuum or sweep hard floors; mop where appropriate. Allow floor to dry fully before walking on it.
Tip: Wring mop well to avoid wet patches on wood floors. - 6
Deodorize and refresh
Apply air freshener or open windows briefly after cleaning to improve air feel. Don’t rely on scent alone to judge cleanliness.
Tip: Ventilate for 5-10 minutes after cleaning. - 7
Empty and sanitize bins
Remove trash, replace liners, and wipe bin interior. A clean bin helps prevent lingering odors.
Tip: Keep spare liners readily accessible. - 8
Final check and plan
Walk through the space with a mental checklist of touchpoints: doorknobs, switches, and edges. Schedule the next check.
Tip: Set a recurring reminder to maintain momentum.
Questions & Answers
What does it mean to evaluate how clean is your house in practice?
It means checking high-traffic surfaces, clutter, air quality, and routine maintenance to form a realistic gauge of cleanliness.
It means checking surfaces, clutter, and air quality to see how clean your home is.
How often should I perform the cleanliness check?
Aim for a weekly quick check and a deeper monthly review to adjust routines and tools.
Do a quick weekly check and a deeper monthly review.
Do I need special tools to measure cleanliness?
Basic items like microfiber cloths, an all-purpose cleaner, a vacuum, and a timer are sufficient for most homes.
Basic tools like cloths, cleaner, vacuum, and a timer are enough.
How can I keep motivation for cleaning over time?
Set simple routines, track progress with quick checks, and celebrate small wins to stay consistent.
Set simple routines and celebrate small wins.
What about air quality and ventilation in the cleanliness check?
Ventilation and indoor air quality impact perceived cleanliness; open windows when possible and consider an air purifier for high-traffic spaces.
Ventilation affects cleanliness; open windows or use an air purifier.
Are natural cleaners enough for real-world grime?
Natural cleaners can be effective for routine surfaces; for tough grime or germs, pair with appropriate cleaners and follow safety guidelines.
Natural cleaners work for routine grime; for tough dirt, use the right cleaners.
Watch Video
The Essentials
- Define a simple, repeatable cleanliness check.
- Prioritize high-traffic zones for the biggest gains.
- Use microfiber and proper tools to improve results.
- Schedule regular checks to maintain progress.
- Involve others to share the cleaning load.