How to Clean Jewelry with Ultrasonic: A Safe, Effective Guide
Learn how to clean jewelry with ultrasonic safely, what to clean and what to avoid, and a practical step-by-step workflow. Tips from Cleaning Tips for homeowners and renters seeking practical care for sparkling pieces.

Ultrasonic jewelry cleaning uses high-frequency sound waves in a gentle liquid to create microscopic cavitation bubbles that lift grime from metal and stones. This method is fast and effective for many metals, but requires care with delicate settings and certain gemstones. This guide explains when to use it, how to prepare, and how to clean safely at home.
How ultrasonic cleaning works for jewelry
Ultrasonic cleaning relies on cavitation—tiny bubbles forming and collapsing rapidly in a cleaning solution. As these bubbles collapse, they create microjets that dislodge dirt from crevices in metal surfaces and settings. For most solid metals like gold, silver, and platinum, this process can dramatically reduce scrubbing time and restore shine. According to Cleaning Tips, properly tuned ultrasonic cleaners use a gentle frequency and a jewelry-safe solution to minimize potential harm to stones. The Cleaning Tips team found that the overall effectiveness hinges on choosing the right liquid, avoiding overly strong cleaners, and not submerging items with fragile settings. When used correctly, ultrasonic cleaning can be a practical option for routine maintenance and quick refreshes between professional cleanings. It’s not a substitute for professional inspection, but it does reduce grime that dulls brilliance. Always follow manufacturer guidance for your unit and jewelry, and treat each piece based on its materials.
What to clean with ultrasonic and what to avoid
Ultrasonic cleaning works best for metal-based jewelry with non-porous stones like diamonds, sapphires, and rubies. It’s generally safe for finished surfaces and modern settings, but you should avoid porous or delicate stones that can be damaged by vibration or moisture, such as certain opals or untreated pearls. Jewelry made with soft metals, loose prongs, or vintage settings may also be vulnerable. Cleaning Tips recommends testing a small, inconspicuous area first and using a jewelry-specific cleaning solution that is compatible with your metal and stones. Before you begin, remove any glued-on accents or stones that look loose, and ensure the piece is dry and free of loose debris that could become a projectiles inside the cleaner.
Preparing your jewelry for ultrasonic cleaning
Before submerging, inspect each piece for loose stones or bent prongs. If you detect any damage, skip ultrasonic cleaning and seek professional service. Remove earrings with clip-on backs and any pieces with gemstones that sit in bezels rather than prongs. Rinse unseen dirt with a soft cloth, and set up your cleaner in a well-ventilated area away from children and pets. Place items in a performance-friendly basket or tray to prevent tangling and protect delicate chains. If your cleaner offers multiple frequencies, start with the lowest setting for most jewelry and reserve higher frequencies for very dirty pieces. Use distilled water and a jewelry-safe cleaning solution according to the manufacturer’s directions.
Using the ultrasonic cleaner safely
Always use a cleaner setting appropriate for jewelry and avoid running the unit dry. Make sure the chamber is filled to the recommended level and that pieces do not touch each other, which could cause scratching or tangling. Submerge items according to their size, and always start with the gentlest cycle. If you’re unsure about a piece, consult a jeweler before cleaning. For safety, wear protective eyewear if you’re working near the unit and keep the device unplugged when loading or removing pieces.
After cleaning: rinse, dry, inspect
Rinse each item under clean, lukewarm water to remove any remaining cleaning solution. Use a soft brush selectively to remove stubborn grime, then pat dry with a lint-free microfiber cloth. Drying is essential to prevent water spots or oxidation, especially on silver. Inspect each piece for shine and check that stones are secure. If a piece looks cloudy or rough after cleaning, repeat the process with a shorter cycle or switch to a milder cleaner. Store jewelry in a soft pouch or lined box to prevent scratches between cleanings.
Troubleshooting common issues and mistakes
Common mistakes include overexposure, which can loosen stones or dull certain finishes, and using a harsh cleaning solution that can damage metals. If you notice discoloration or fogging, halt cleaning and rinse immediately; consult a professional if the issue persists. Porous stones like certain opals or untreated pearls should never be cleaned ultrasonically. Always check the piece’s construction—any loose settings or enamel should not be subjected to ultrasonic cleaning. Finally, don’t switch to a different, unproven cleaner mid-cycle; inconsistent results can occur when mixing product chemistries.
Care tips and long-term maintenance
Plan routine cleanings every few months rather than waiting until stones look dull. Combine ultrasonic sessions with gentle hand cleaning for larger items or pieces with fragile details. Keep your cleaner in a dry, stable location away from direct sunlight. Use distilled water to minimize mineral buildup that can interfere with cleaning efficiency. Consider scheduling periodic professional inspections to verify settings and tighten stones. By pairing at-home care with professional guidance, your jewelry stays brilliant longer.
Tools & Materials
- Ultrasonic jewelry cleaner(Ensure it has a jewelry basket and adjustable frequencies.)
- Jewelry-safe cleaning solution(Choose a solution compatible with your metals and stones.)
- Distilled water(Avoid minerals that can leave deposits.)
- Soft brush or microfiber cloth(Gently lift grime from intricate areas.)
- Tweezers or soft pick(Assist in handling delicate pieces.)
- Soft microfiber towel(For drying and buffing after rinse.)
- Safety glasses (optional)(Wear if you're working with liquids near eyes.)
Steps
Estimated time: 20-35 minutes
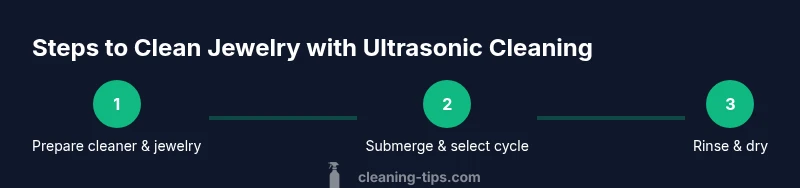
- 1
Check piece for compatibility
Inspect each item for loose stones, bent prongs, or repairs. If any issues are found, skip ultrasonic cleaning and seek professional service.
Tip: Safety first—damaged settings can worsen with ultrasonic action. - 2
Prepare cleaner and jewelry
Set up the cleaner with distilled water and the jewelry-safe solution according to the manufacturer’s directions. Place items in the basket to avoid direct contact with the tank bottom.
Tip: Test a small area first if you’re unsure about a finish. - 3
Submerge and choose cycle
Submerge pieces, ensuring they do not touch. Begin with a low-frequency, short cycle and adjust only if needed for very dirty items.
Tip: Starting gentle reduces risk of damage to delicate pieces. - 4
Rinse immediately after cycle
Remove items with tweezers and rinse under clean, lukewarm water to wash away any remaining solution.
Tip: Never leave jewelry soaking after a cycle ends. - 5
Dry thoroughly
Pat dry with a microfiber towel and air-dry the pieces completely before storage.
Tip: Drying fully prevents water spots and tarnish. - 6
Inspect and repeat if needed
Check for remaining grime; repeat briefly if necessary with a milder cycle. Do not exceed recommended times.
Tip: Overcleaning can wear down finishes. - 7
Store safely
Store each piece separately in a soft pouch or lined box to prevent scratches between cleanings.
Tip: Keep away from direct sunlight and humidity.
Questions & Answers
Is ultrasonic cleaning safe for all jewelry types?
No. Porous stones and loose settings may be damaged. Always assess each piece’s materials and condition before cleaning ultrasonically.
Not all jewelry is safe for ultrasonic cleaning. Porous stones and loose settings require caution or alternative cleaning methods.
Can I use tap water or household cleaners in the ultrasonic cleaner?
Tap water can leave mineral deposits; use distilled water with a jewelry-safe solution. Avoid household cleaners that aren’t designed for jewelry.
Use distilled water and a jewelry-safe cleaner to avoid mineral buildup and damage.
Should I remove jewelry before cleaning?
Yes. Remove a piece if you notice damage, or if it has fragile settings that could be loosened by vibration. Always handle with care.
Yes—remove pieces with loose settings or damage before using the cleaner.
What stones should I avoid cleaning ultrasonically?
Avoid porous stones (e.g., certain opals, some pearls) and stones sensitive to heat or vibration. When in doubt, check with a jeweler.
Avoid porous or heat-sensitive stones; when unsure, consult a professional.
How long should I run the cleaner for a typical ring?
Start with a short cycle and assess results. Do not exceed the recommended duration in your cleaner’s manual for delicate pieces.
Start with a short cycle and don’t overdo it.
Is ultrasonic cleaning better than hand washing?
Ultrasonic cleaning is faster and often more effective for grime in hard-to-reach areas, but it isn’t universal. Use it as a supplement to, not a replacement for, gentle hand cleaning and professional checks.
It can be faster and cleaner for tough grime, but not a replacement for careful cleaning and professional checks.
Watch Video
The Essentials
- Check compatibility before cleaning.
- Use distilled water and jewelry-safe solution.
- Rinse and dry thoroughly after each cycle.
- Inspect settings and avoid porous stones when possible.