How to Clean Mold From Grout: Complete Step-by-Step Guide
Learn practical, safe methods to clean mold from grout in bathrooms. This guide covers DIY cleaners, safety tips, tools, and prevention strategies from Cleaning Tips.

You can clean mold from grout effectively with everyday cleaners and proper technique. Start by ventilating the area, protecting yourself with PPE, and choosing a mold-killing solution like vinegar or hydrogen peroxide. Scrub the grout lines, rinse thoroughly, and dry completely; seal the grout afterward if desired to reduce recurrence.
Why Mold in Grout is a Health and Home Issue
If you're wondering what clean mold from grout entails, this guide answers the question and shows practical steps for bathrooms. Mold in grout isn't just unsightly; it can affect indoor air quality and trigger allergies or asthma in sensitive people. According to Cleaning Tips, moisture control is the first line of defense because mold needs a damp environment to thrive. The Cleaning Tips team found that most recurring mold results come from slow drying after showers, poor ventilation, and porous grout that traps moisture. By understanding the biology of mold and the nature of grout, you can choose cleaning strategies that actually work rather than masking the problem. We'll cover safe cleaners, tools, drying steps, and long-term prevention so you can enjoy a cleaner, healthier bathroom.
What Clean Mold From Grout Really Means
Mold on grout is both cosmetic and functional: it may stain grout color and indicate ongoing moisture. Effective cleaning means removing visible growth and killing a significant portion of mold spores, followed by thorough drying to prevent regrowth. Not all mold is equally dangerous, but lingering spores can impact air quality, particularly in small bathrooms. The Cleaning Tips team notes that visible mold does not always indicate deep contamination; if you suspect hidden mold behind tiles or under flooring, consult a pro. When you clean, focus on the grout’s porosity and the surrounding grout lines, not just the surface. As with any home-remediation task, safety and ventilation matter as much as the product you choose.
Safe Cleaning Solutions: DIY vs Store-Bought
DIY solutions can be effective and inexpensive for grout mold. A common approach uses white vinegar (untreated) or a baking soda paste applied to the grout and left to sit briefly before scrubbing. Hydrogen peroxide is another option, especially for white or light-colored grout, but test a hidden area first to avoid discoloration. For stubborn mold or colored grout, a commercial cleaner formulated for grout can help, but always read labels and test a small area. Cleaning Tips emphasizes testing a small area first, using PPE, and never mixing cleaners (for example, vinegar with bleach is a dangerous combo). Store-bought cleaners may contain peroxide, surfactants, or enzymes designed to penetrate grout, but you should still follow safety instructions.
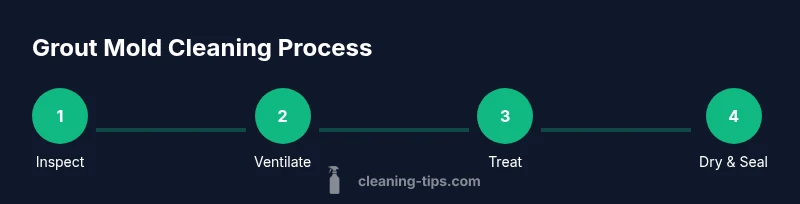
Step-By-Step: How to Clean Grout Mold
Cleaning grout mold involves several coordinated actions: protect yourself with PPE, ventilate the room, and gather the right tools. Apply cleaner to the grout lines, allow it to penetrate, then scrub with a stiff brush and a softer brush for corners. Rinse thoroughly and dry the area completely. If color is important, consider an initial color-safe test to ensure cleaners do not lighten or discolor grout. After cleaning, evaluate whether a grout sealer is appropriate for your bathroom to reduce future moisture penetration. Remember, consistent moisture control is the key to long-term success, as mold thrives where water sits.
Preventive Maintenance to Stop Mold from Coming Back
Prevention is simpler than remediation. Improve ventilation by running a bathroom fan during and after showers, or open a window to reduce humidity. Wipe down surfaces after use and fix any leaks promptly. Consider applying a grout sealer after the grout is completely dry; sealing reduces water absorption and makes future cleaning easier. Clean grout lines regularly to avoid soap scum buildup, which can trap moisture and nutrients that feed mold. Regular maintenance, rather than aggressive cleaning, keeps mold from regrowing in the long term.
Common Mistakes and Safety Warnings
Common mistakes include mixing cleaners, using hot water on delicate grout, and skipping drying times. Never mix vinegar with bleach or ammonia; dangerous gases can form and harm your health. Avoid abrasive powders that can erode grout or worsen staining. Always wear PPE, ventilate, and work in small sections to prevent damp areas from rewetting nearby surfaces. If you smell a strong mold odor or see growth behind tiles, consider professional assessment rather than attempting to remediate mold in hidden spaces.
When to Seek Professional Help
If you notice extensive mold growth, persistent odors, or staining that returns after cleaning, professional assessment may be necessary. Underlying issues such as water leaks, poor ventilation, or structural moisture can cause recurring mold growth that simple cleaning cannot resolve. Cleaning Tips recommends seeking a licensed contractor or mold remediation specialist if you have concerns about safe removal, particularly in bathrooms with repeated moisture exposure or tile damage. Early professional input can prevent bigger problems and protect indoor air quality.
Tools and Materials Overview for Grout Mold Cleaning
A quick tour of essential tools shows you what to gather before starting: PPE (gloves, goggles, respirator), a stiff nylon brush, an old toothbrush for grout joints, a spray bottle, a bucket, a microfiber cloth for drying, and cleaning agents such as white vinegar and baking soda. Optional but helpful tools include a hydrogen peroxide bottle and a grout sealer for after-clean prevention. Having everything ready saves time and reduces the chance of re-moisturizing grout during the process.
Quick Troubleshooting Scenarios
If results seem partial, reapply a cleaner to the most stubborn joints and allow more dwell time before scrubbing again. For colored grout, perform a spot test to ensure no color loss. If the grout remains dark after cleaning, it may be deeply stained or damaged; in such cases, resealing or grout replacement could be required. In showers with high humidity, consider additional moisture-control measures such as a dehumidifier or upgraded ventilation to keep mold at bay.
Tools & Materials
- Nitrile gloves(Powder-free gloves with chemical resistance)
- Safety goggles(Eye protection (ANSI Z87.1))
- N95 respirator(For protection against mold spores)
- Stiff nylon scrub brush(3-4 inch width for grout lines)
- Old toothbrush(For precision scrubbing in joints)
- Spray bottle(For applying cleaners evenly)
- Bucket(For mixing solutions and rinsing)
- White vinegar (5%)(Antimicrobial; use full strength or diluted 1:1 with water)
- Baking soda(Create paste for cleaning)
- Hydrogen peroxide (3%)(Alternative disinfectant; test color first)
- Chlorine bleach(Only on bleach-safe grout; never mix with ammonia)
- Grout sealer(Apply after grout dries to prevent future mold)
Steps
Estimated time: 1 hour 30 minutes - 2 hours (plus 24 hours cure time if sealing)
- 1
Prepare and protect
Lay out your tools, put on PPE, and ensure good ventilation. Remove towels or objects from the area to keep the workspace clear and reduce accidental spread of mold spores.
Tip: Ventilate the room with a fan or open window before starting. - 2
Dry the area and remove debris
Wipe damp surfaces with a dry cloth to remove standing moisture and loose grime. This makes subsequent cleaning more effective and prevents diluting cleaners.
Tip: Dry grout joints as you go to limit mold growth during the process. - 3
Mix or select cleaner
Choose between a vinegar solution or baking soda paste. If using peroxide or a commercial cleaner, follow label directions. Do not mix cleaners.
Tip: Test a small, inconspicuous area first to avoid discoloration. - 4
Apply cleaner to grout
Apply the cleaner to all grout lines with a spray bottle or paste. Let it dwell for 5–10 minutes to penetrate the pores.
Tip: Avoid over-wetting surrounding tiles to minimize splash onto walls. - 5
Scrub grout lines
Scrub along the grout lines using the stiff brush, then target stubborn spots with the toothbrush. Work in small sections.
Tip: Use a firm but controlled pressure to prevent damaging grout. - 6
Rinse and inspect
Rinse with clean water and wipe dry. Inspect for remaining mold and repeat treatment on persistent joints if needed.
Tip: Ensure all cleaner residue is removed to prevent future staining. - 7
Dry thoroughly
Air-dry the area completely; you may speed up with a fan or dehumidifier. Moisture control is essential to prevent regrowth.
Tip: Do not seal grout until it is fully dry (usually 24 hours). - 8
Seal grout (optional but recommended)
Apply a grout sealer per product directions after the grout has dried completely. Sealing helps repel moisture and reduces future mold growth.
Tip: Re-seal every 1–2 years depending on use and cleaning frequency.
Questions & Answers
Is it safe to clean mold with vinegar?
Vinegar can help kill some mold on grout, but it may not remove all stains or deeply embedded mold. Use it as a first-step treatment and follow with thorough rinsing and drying. If mold persists, try hydrogen peroxide or a commercial grout cleaner, and consider professional help for stubborn cases.
Yes, vinegar is a common first-step cleaner for grout mold, but if the mold returns, you may need a stronger cleaner or professional assistance.
Can mold come back after cleaning grout?
Yes, mold can reappear if moisture remains or if grout remains damp after cleaning. Ensure complete drying, fix leaks, and improve ventilation. Reconsider sealing grout to reduce future moisture penetration.
Mold often comes back if the area stays damp; drying and moisture control are essential.
Should I use bleach on mold in grout?
Bleach can whiten grout but may not kill deeply embedded mold and can discolor some grout colors. It should be used with caution and never mixed with ammonia or vinegar. Always test first and ventilate well.
Bleach can help with whitening, but be careful about color and safety.
How long does grout need to dry after cleaning?
Grout typically needs 24 hours to dry completely before sealing. In humid bathrooms, allow extra time and ensure there is adequate airflow to prevent residual moisture.
Give grout a full day to dry before sealing for best results.
Should I seal grout after cleaning?
Sealing grout after it dries can reduce moisture absorption and slow future mold growth. It is especially helpful in showers and high-humidity baths.
Sealing helps keep grout water-repellent after it dries.
Can I use hydrogen peroxide on colored grout?
Hydrogen peroxide is effective but can bleach or discolor certain colors. Test on a hidden area first and use 3% solution sparingly on color-safe grout.
Test first; peroxide can brighten some grout but may discolor others.
Watch Video
The Essentials
- Wear PPE and ventilate before cleaning.
- Choose simple cleaners like vinegar or baking soda first.
- Do not mix cleaners; test on a small area.
- Dry grout completely and consider sealing after cleaning.
- Address moisture sources to prevent recurrence.