How to Use a Pressure Washer to Clean Your Car Safely
Learn how to safely use a pressure washer to clean your car exterior. This step-by-step guide covers nozzle selection, detergents, prep, washing technique, and aftercare—crafted by Cleaning Tips for homeowners and renters.

With the right nozzle, gentle pressure, and careful technique, a pressure washer can safely clean a car’s exterior. This guide covers nozzle selection, detergent options, proper prep, a step-by-step washing sequence, and aftercare to protect paint and trim. Following these best practices from Cleaning Tips helps prevent damage and achieves a showroom-worthy finish.
Why a Pressure Washer Is Useful for Cars (With Cautions)
A pressure washer can dramatically reduce the effort required to remove stubborn road grime, stuck-on dirt, and insect residue from your car’s exterior. When used correctly, it speeds up cleaning while minimizing contact with the surface, which can help prevent micro-scratches from rubbing. The key is to avoid blasting paint, rubber seals, or exposed electrical components and to respect manufacturer guidelines for your machine. The Cleaning Tips team notes that safety and technique matter more than raw power; a gentle approach yields better, safer results over time. Always start with a low pressure setting and a wide spray to gauge how the surface responds, then increase pressure only where necessary.
Choosing Nozzles, Detergents, and Settings
Nozzle choice determines how aggressively dirt is removed and how much risk is posed to your car’s finish. For most cars, a wider spray angle (like 25- or 40-degree) is safer than a narrow, high-pressure stream. A low-pressure setting is ideal for painted panels, trim, and glass, while wheels and wheel wells can tolerate a bit more heft with caution. Detergent choice matters: use a dedicated car wash soap rather than household cleaners, which can strip wax or damage finishes. If your washer offers adjustable PSI, start at the lowest effective level and increase only after testing a small patch. Always ensure the detergent nozzle is correctly attached and rinsed away thoroughly to avoid residue.
Prep Your Vehicle: Protect, Patch Test, and Plan
Before you spray, park in a shaded area or wait for the car to cool to avoid water spots. Remove loose debris with a quick pre-rinse, then seal sensitive areas like mirrors, lights, and door gaps with painter’s tape or protective coverings if you’re concerned. Perform a small patch test on an inconspicuous area to confirm that the combo of spray and detergent won’t harm the paint or decals. Don’t spray directly at electrical components, exposed wiring, or airbags. Keeping the nozzle at arm’s length helps you gauge reaction and adjust as needed.
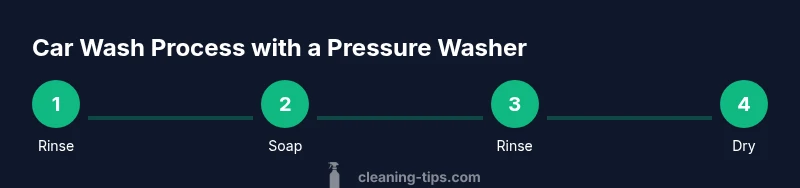
Step-by-Step Overview: Top-to-Bottom, Section by Section
Washing from top to bottom minimizes drag of dirt across clean areas and reduces smear on surfaces already treated. Treat delicate features with lighter sprays, and reserve stronger streams for wheels and lower panels if necessary. If you have metallic or clear-coat finishes, consider additional protective steps like a final rinse and quick-dry to preserve luster. The goal is a clean surface with minimal risk of water intrusion or paint damage.
Common Mistakes and Aftercare
Common mistakes include using household detergents, blasting directly at seals or glass, and drying with rough towels that scratch the surface. After washing, dry the car with microfiber towels to prevent water spots and reapply wax or sealant as needed to maintain protection. Periodically inspect panels for chips or lifted coatings and address them promptly. Regular maintenance—paired with proper technique—helps you extend the life of the finish and keep the car looking its best.
Tools & Materials
- Pressure washer with adjustable nozzle(Choose a model with a wide spray and adjustable PSI; avoid high-pressure settings on paint.)
- Car wash soap (pH-balanced)(Avoid household detergents which can strip wax.)
- Wide-angle nozzle (25°–40°)(Safer spray for painted surfaces; start wide and adjust.)
- Two-bucket washing system (labeled)(Helps minimize dirt transfer; use one for soapy wash, one for rinsing mitt.)
- Microfiber wash mitts and towels(Gentle on paint; use separate towels for drying.)
- Wheel brush and dedicated wheel cleaner(Avoid cross-contamination with the body wash.)
- Painter’s tape or protective film(Protect moldings and sensitive areas if desired.)
- Gloves and eye protection(Always protect skin and eyes when spraying.)
Steps
Estimated time: 60-90 minutes
- 1
Rinse the car to loosen dirt
Begin with a gentle pre-rinse from the top down, using a wide spray at a distance of roughly arm's length. This loosens surface dirt and reduces abrasion during washing. Avoid aiming directly at gaps where water could seep behind trim.
Tip: Keep the wand moving to avoid creating concentrated streams that can etch paint. - 2
Prepare soap and apply to the surface
Fill a bucket with car wash soap according to the manufacturer’s instructions and use a quality wash mitt. Apply soap from the top section downward in sections, allowing the suds to lift dirt before you rinse each area. Do not let soap dry on the surface.
Tip: Use a dedicated wash mitt and avoid circular scrubbing that can scratch paint. - 3
Rinse the soap before detailed cleaning
Rinse away the suds starting from the top again, ensuring all soap is removed before focusing on the lower panels or wheels. This reduces the chance of dirt re-depositing on clean areas. Check for any remaining stubborn spots.
Tip: Maintain a steady, low-angle spray to avoid forcing water under gaps. - 4
Clean wheels with appropriate brush
Use a wheel cleaner and brush to remove brake dust and grime. Keep followers of spray away from body panels to minimize splash. Rinse wheels thoroughly after brushing.
Tip: Do not spray directly at the tire sidewall with high pressure; it can drive dirt into the tread grooves. - 5
Rinse the entire vehicle again
Give a final, light rinse all over the car to remove any remaining soap and loosened dirt. Focus on ensuring all soap is removed from crevices and trim. A clean rinse reduces residue and helps with drying.
Tip: Work from top to bottom to prevent dirt from moving onto freshly cleaned areas. - 6
Dry and inspect the paint
Use microfiber towels to dry, then inspect for water spots or missed areas. If you notice spots, re-dry those areas. Consider applying wax or sealant after drying for protection.
Tip: Pat dry rather than wiping vigorously to minimize micro-scratches. - 7
Post-wash care and storage
Store equipment properly, rinse cleaners from hoses, and empty soap containers. Dry and store towels in a clean, dry place to prevent mildew. Regular detailing preserves the finish and longevity of your car’s exterior.
Tip: Keep your pressure washer nozzle clean; a clogged nozzle reduces spray quality and increases risk of damage.
Questions & Answers
Can I use a pressure washer on a modern car without damaging the paint?
Yes, if you use a wide-angle nozzle, low to moderate pressure, and keep the wand at a safe distance. Avoid direct high-pressure contact with painted surfaces and seals. Always test on a small area first.
Yes, you can, as long as you use a wide nozzle, keep it at a safe distance, and test a small area first.
What nozzle angle is safest for car washing?
A wider angle nozzle, such as 25° to 40°, is safest for most car surfaces. Start with the widest setting and narrow only if needed and safe.
Use a wide-angle nozzle like 25 to 40 degrees and avoid sharp, direct streams on paint.
Should I use soap or wax with the pressure washer?
Use a pH-balanced car wash soap during washing. Wax is applied after drying as a separate step to protect the finish, not as part of the washing cycle.
Use car wash soap during washing, and apply wax after drying as a separate step.
Is it safe to wash wheels with a pressure washer?
Wheels can be cleaned with a pressure washer using a dedicated wheel cleaner, but avoid aiming at the tire sidewalls with high pressure. Rinse thoroughly after cleaning.
Yes, with a wheel cleaner and careful technique; avoid high pressure on tires.
How often should I wash my car with a pressure washer?
Frequency depends on climate and driving conditions. Wash when you notice dirt buildup, but always use proper technique and protect coatings to extend finish life.
Wash when dirt builds up, using proper technique to protect coatings.
What should I avoid spraying directly at around the car’s seals?
Avoid direct, forceful sprays at door seals, window seals, and emblems, which could cause water intrusion or wear.
Don’t spray directly at door and window seals with high pressure.
Watch Video
The Essentials
- Choose a wide-angle nozzle for car washing and avoid high-pressure on paint.
- Pre-treat with soap, then rinse top-to-bottom to minimize dirt transfer.
- Dry thoroughly and reapply protective coating to maintain finish.