What Order to Clean In: A Practical Step-by-Step Guide
Learn the most effective cleaning order to maximize efficiency and minimize cross-contamination. This comprehensive guide explains top-to-bottom, clean-to-dirty sequencing, with room-by-room tips, checklists, and a proven routine you can adapt for any home.

According to Cleaning Tips, establish a repeatable cleaning order to reduce recontamination and save time. In this quick-start, you’ll learn what order to clean in, plus a practical, top-to-bottom sequence you can apply in kitchens, bathrooms, bedrooms, and living areas to keep your home consistently fresh and organized, and avoid backtracking or cross-contamination.
Why the cleaning order matters
A clear cleaning order matters because dirt and grime tend to travel with gravity and airflow. If you start in a dirty area or wipe a surface only to drag dust into a previously cleaned zone, you undo progress. By following a consistent order, you create a predictable routine that minimizes recontamination, reduces backtracking, and makes it easier to track progress. The Cleaning Tips team emphasizes that even a simple top-to-bottom, left-to-right approach can dramatically improve results. When you commit to a defined sequence, you also create an opportunity to optimize supplies, reduce clutter, and involve household members in a shared routine, which improves adherence over time.
In practice, the order should minimize the likelihood of dirtying clean surfaces. Start with areas that accumulate dust or airborne particles, then tackle surfaces that collect grime and spills, and finally finish with the floors or textiles. This approach aligns with general sanitation principles and can be adapted to fit spaces of any size. Remember, a consistent order reduces decision fatigue and helps you stay efficient, even on busy cleaning days. Cleaning Tips analysis shows that following a standard order correlates with faster completion and fewer re-dos across typical homes.
In short, the order you choose sets the pace, reduces cross-contamination risks, and makes ongoing cleaning less daunting. Your goal is to create a repeatable routine that works for your space and lifestyle, so you can maintain a healthier home with less effort over time.
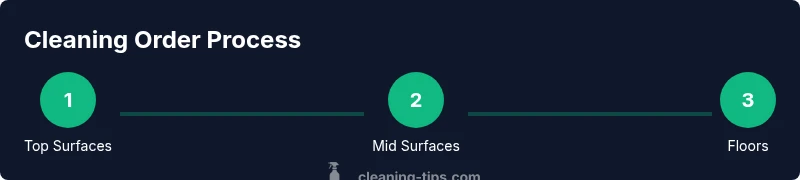
The general rule: clean from clean to dirty
The simplest way to think about cleaning order is to move from the areas with the least amount of visible dirt to the areas with the most. This “top-to-bottom, left-to-right” rule minimizes dirt being tracked onto already-cleaned surfaces. Start with high surfaces (ceiling corners, fan blades, high shelves) where dust collects and gravity naturally pulls debris downward. Then proceed to mid-level surfaces (countertops, tabletops, appliance exteriors) before addressing the dirtiest zones (sinks, toilets, shower stalls, and floors).
This rule also preserves your supplies. By cleaning from clean to dirty, you use the same cloth for as long as possible before it becomes too dirty to be effective. If you must wipe a particularly dirty surface, switch to a fresh cloth to avoid spreading grime. Remember, consistency beats intensity: a steady routine will outperform sporadic, marathon cleans.
A practical cleaning order you can follow
Use this practical sequence as a default for most homes:
- Start with ceilings, fans, and light fixtures to remove dust before it falls.
- Move to high shelves and ledges, wiping down corners and walls.
- Tackle countertops, cabinet fronts, and appliance exteriors to remove dust and fingerprints.
- Clean sinks, faucets, and toilets in bathrooms while surfaces are still dry enough to prevent streaks.
- Clean mirrors and glass surfaces for streak-free visibility.
- Finish with floors: vacuum or dry mop first, then damp mop or steam as needed.
- Finally, address textiles (cushions, throws, and drapes) if needed.
This sequence keeps your workflow logical and reduces the chance of reapplying dirt to clean areas. If you’re cleaning a single room, adapt the order to the room’s unique dirt pattern, but keep the top-to-bottom principle. The more you stick to a consistent order, the quicker you’ll become at recognizing what to do next.
Room-by-room adaptation
Different rooms have distinct dirt patterns and contamination risks. In kitchens, prioritize appliance exteriors, sink areas, and prep surfaces to prevent cross-contamination between food zones. In bathrooms, start with fixtures and tiles, then move to mirrors and glass, and finish with floors where water splashes accumulate. Living rooms and bedrooms benefit from a top-down sweep that starts with ceiling dust and goes down to furniture surfaces and flooring. By adapting the general order to each space, you preserve efficiency while maximizing cleanliness. Cleaning Tips findings show that room-specific tweaks keep routines relevant as families and households change over time.
Additionally, consider entryways and high-traffic zones. If a space is especially dusty or shared by pets, you may start with those zones but still maintain the overall top-to-bottom approach to prevent re-inline contamination. The goal is to tailor the sequence so it feels natural and manageable in daily life, not to rigidly exhaust every corner in one go.
Tools and products that help maintain the order
Having the right tools in easy reach supports the order you want to maintain. Use color-coded microfiber cloths so you don’t transfer soil from one area to another, and designate cloths for surfaces, glass, and appliances. Wipe surfaces with a general-purpose cleaner first, then switch to a streak-free cleaner for glass and mirrors. A dedicated mop or microfiber pad for floors helps ensure that dirt lands where it belongs.
Keep your cleaning products organized on a caddy or shelf by room, so you can follow the sequence without hunting for supplies. Label bottles clearly and replace exhausted items promptly to avoid delays mid-clean. Using a simple checklists helps new cleaners stay on track and reduces the cognitive load of deciding what to do next.
Common mistakes and how to avoid them
Common mistakes include skipping the top surfaces and starting with a visibly dirty spot, which guarantees recontamination of already-clean areas. Another pitfall is reusing a dirty cloth, which spreads grime across multiple surfaces. Ventilation is often overlooked; poor air circulation makes chemicals less effective and can cause irritation. Finally, many people neglect to adapt the order to rooms with unique hazards, such as kitchens with heavy grease or bathrooms with hard water stains. By avoiding these mistakes and sticking to a consistent top-to-bottom sequence, you’ll see better results with less effort.
Quick maintenance routines to reinforce the habit
Turn the cleaning order into a daily habit by pairing small routines with the larger plan. For example, a 15-minute “mini-clean” each afternoon focusing on one room helps you keep surfaces dust-free and reduces the need for longer, more intensive sessions. Schedule a weekly 30–45 minute deep-clean that follows the standard order but concentrates on stubborn spots like grout or appliance gaskets. Use reminders or a calendar to hold yourself accountable. Over time, sticking to the order becomes second nature and keeps your home healthier.
Putting it into practice: a 60-minute example routine
If you’re short on time, you can still apply the order with a quick, efficient routine. Start with ceiling corners and light fixtures to remove accumulated dust (3–5 minutes). Move to high shelves and ledges (5–7 minutes). Wipe down countertops and appliance exteriors (8–10 minutes). Clean the sink and mirror in the kitchen (5 minutes) and bathroom (5 minutes). Finally, vacuum and mop the floor, moving methodically across the room (15–20 minutes).
This streamlined, top-to-bottom approach keeps momentum and minimizes backtracking. If you have pets, air out spaces or mop after airing to reduce odors. The key is consistency: keep the order the same each time so you’re never guessing what to do next.
Tools & Materials
- Trash bags(Line the trash can and have extra bags for disposables)
- Microfiber cloths(Multiple colors recommended for different zones)
- All-purpose cleaner(Eco-friendly if possible; avoid mixing cleaners)
- Glass cleaner(For mirrors and glass surfaces)
- Disinfectant (EPA-registered)(Follow label directions; wear gloves if needed)
- Bucket and mop or microfiber mop(For floor cleaning; use a separate mop for bathrooms if possible)
- Gloves(Optional but helps protect hands)
- Ventilation aid (open windows, fan)(Keep air moving during cleaning)
Steps
Estimated time: 60-75 minutes
- 1
Identify starting zone
Scan each room for clutter and select a starting zone with minimal debris to build momentum. This initial choice sets the pace and helps you avoid backtracking later. Consider a corner or area that’s easiest to reach without moving heavy objects.
Tip: Choose a zone you can finish in 5–7 minutes to gain early confidence. - 2
Clean high surfaces first
Dust ceiling corners, fan blades, light fixtures, and high shelves. Dust falls, so addressing the high points prevents recontaminating lower surfaces. Use a microfiber cloth or duster and wipe in a consistent direction.
Tip: Work clockwise to build a smooth rhythm. - 3
Tackle walls and fixtures
Wipe walls, doors, frames, and light switches. Use a damp cloth for walls if needed, and dry with a clean microfiber to prevent streaks. This prevents grime from moving to cleaned surfaces below.
Tip: Avoid oversaturation to protect wall paint or wallpaper. - 4
Wipe counters and furniture
Move to kitchen and living areas, wiping countertops, table surfaces, and furniture tops. Use a designated cloth for each surface type and wipe in a uniform direction to minimize streaks.
Tip: Change cloths frequently to keep soil from moving between zones. - 5
Clean appliance exteriors
Wipe the outside of appliances (fridge, oven, microwave) with an appropriate cleaner. Do not spray cleaners directly on electronics; apply to a cloth and wipe edges. This reduces fingerprints and grease build-up.
Tip: Use a separate cloth for stainless-steel surfaces if available. - 6
Address bathrooms and fixtures
Clean sinks, faucets, countertops, and toilet exteriors. If your surface requires, use disinfectant following label directions. Allow surfaces to dry before moving to the next step.
Tip: Ventilate the space to minimize chemical odor exposure. - 7
Do floors last
Vacuum or sweep first to pick up loose dirt, then mop. Work in sections to avoid stepping on freshly cleaned areas. Change water between rooms to prevent cross-contamination if you’re using a mop.
Tip: Always clean floors after all above-surface tasks to capture settled debris. - 8
Final textiles and freshening
Refresh soft surfaces: cushion covers, throws, and pillowcases. Vacuum fabric surfaces or launder items that are washable. Open windows to air out spaces and finish with a final wipe if needed.
Tip: Airing spaces improves overall cleanliness and smells.
Questions & Answers
What is the best order to clean in for a typical home?
A practical order begins with ceiling dust, then high surfaces, countertops, fixtures, and finally floors. Adapt for each room and use separate cloths for different zones to reduce cross-contamination.
Start high, work down, and finish with the floors for best results.
Should I clean from top to bottom?
Yes. Cleaning from top to bottom minimizes recontamination as gravity pulls dirt downward. This approach is especially effective in multi-room homes.
Yes—start high, then move down to protect clean surfaces.
Do I need to rinse surfaces after disinfecting?
Always follow the product label. Some disinfectants require rinsing on food-contact surfaces; others are safe to air-dry. When in doubt, rinse and air-dry.
Check the label to know if rinsing is required.
Can this order work for small spaces?
Absolutely. In small spaces, the same top-to-bottom rule applies. Use a compact caddy and move efficiently from ceiling to floor to prevent backtracking.
Yes, the method scales down well for small areas.
How do I adapt the order for homes with kids and pets?
Prioritize areas your family uses most, then keep high surfaces dust-free. Rotate tasks to fit daily routines and use safer cleaning products when possible.
Make it fit your family’s routine while staying consistent.
How often should I adjust the order?
Adjust the order when you notice persistent mess patterns or new hazards, such as a change in furniture arrangement or the introduction of new cleaners. Consistency remains key.
Change the order only when needed; keep the routine predictable.
Watch Video
The Essentials
- Follow a top-to-bottom cleaning order.
- Start with least-dirty areas to build momentum.
- Use color-coded cloths to prevent cross-contamination.
- Keep a consistent routine to reduce decision fatigue.
- Adapt the order to room-specific dirt patterns when needed.